Complete Guide: Installing Home Assistant on Raspberry Pi for Smart Home Automation
Learn how to set up Home Assistant on your Raspberry Pi, transforming your home into a smart, automated environment. This step-by-step guide walks you through the installation process and configuration tips to get your smart home up and running efficiently.
TUTORIAIS
3/13/20252 min read

Why Choose Home Assistant on Raspberry Pi?
Home Assistant is a powerful open-source platform that allows you to control and automate various smart devices. Installing it on a Raspberry Pi offers an affordable and flexible solution to build your own smart home hub.
What You’ll Need
Raspberry Pi 4 (recommended)
MicroSD card (16GB minimum)
Home Assistant image
Keyboard, mouse, and monitor (for setup)
Network connection
Step-by-Step Installation Guide
1. Download the Home Assistant Image
Begin by downloading the Home Assistant image suitable for your Raspberry Pi model from the official Home Assistant website.
2. Prepare the MicroSD Card
Use a tool like Balena Etcher to flash the Home Assistant image onto your microSD card.
3. Insert the MicroSD Card and Boot the Raspberry Pi
After flashing, insert the microSD card into the Raspberry Pi and power it on. The system will automatically start the Home Assistant installation process.
4. Configure Home Assistant
Once the system boots up, you can configure Home Assistant using your browser. Go to http://homeassistant.local:8123 and follow the on-screen setup instructions.
Setting Up a Smart Plug with Home Assistant
1. Select a Compatible Smart Plug
For a seamless experience, choose a compatible smart plug, such as the TP-Link Kasa Smart Plug or Tuya Smart Plug. These plugs integrate well with Home Assistant and offer features like energy monitoring and scheduling.
2. Integrate the Smart Plug
To connect the smart plug to Home Assistant:
Go to Settings > Devices & Services in Home Assistant.
Click on Add Integration and search for your smart plug’s brand (e.g., TP-Link or Tuya).
Follow the prompts to enter your login credentials and authorize the connection.
3. Automate Your Smart Plug
Once your smart plug is set up, you can create automations to control it based on triggers, such as time of day, device activity, or motion sensors. For example:
Turn on a lamp at sunset:
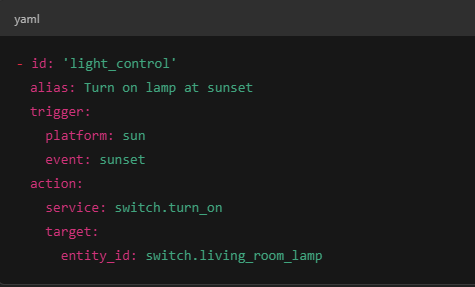
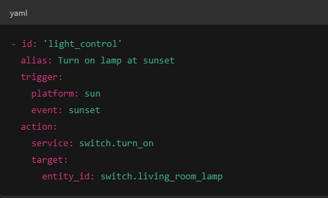
This setup allows you to have more control over your devices and create a truly smart home.
Optimizing Home Assistant on Raspberry Pi
After installation, optimize your Home Assistant by integrating with devices like lights, cameras, thermostats, and more. You can also set up automations and dashboards for an enhanced user experience.
Troubleshooting Tips
If you encounter any issues during installation, ensure your Raspberry Pi is connected to the internet, and double-check the microSD card for any corruption.
Conclusion
Installing Home Assistant on your Raspberry Pi is an excellent way to control your smart home devices in a centralized manner. By following these steps and integrating devices like smart plugs, you can transform your home into an efficient, automated environment, with endless customization options.
For detailed information, visit the official Home Assistant website.
Products used in this tutorial
Automação
Descubra como simplificar sua automação residencial.
Conectividade
contato@conectesuacasa.com
© 2025. All rights reserved.